In this tutorial, we learn how to install kaboxer on Kali Linux. kaboxer is Framework to manage applications in containers.
Introduction
In this tutorial we learn how to install kaboxer on Kali Linux.
What is kaboxer
Built for Kali Linux (and other Debian-based) systems, Kaboxer is a framework providing seamless integrations between applications shipped in containers and the host system.
It allows shipping applications that are hard to package properly or that need to run in isolation from the rest of the system.
The “kaboxer” command line tool can be used to:
- build container images
- retrieve container images
- run applications out of those containers
- integrate those applications in the host system
There are three ways to install kaboxer on Kali Linux . We can use apt-get, apt and aptitude. In the following sections we will describe each method. You can choose one of them.
Update your Kali Linux
So, first of all, we have to update the Kali Linux with the following command.
$ sudo apt update
Now we can upgrade individual packages using sudo apt install PCKAGE_NAME or we can upgrade the whole system using
sudo apt full-upgrade -y
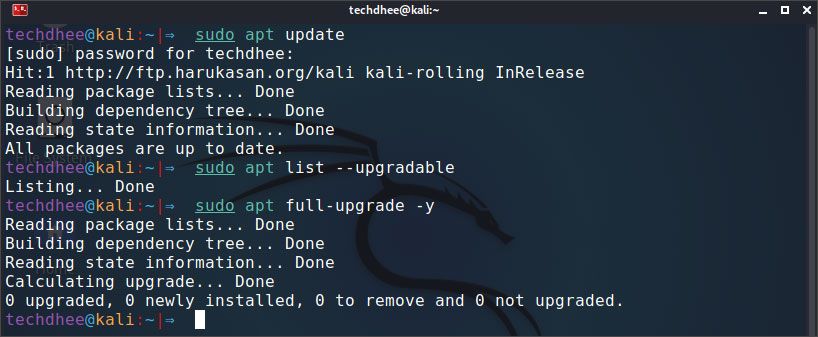
All done. Your Kali Linux system is now fully upgraded. Or you can use all in one command to update and upgrade your Kali Linux using this command.
sudo apt update && sudo apt full-upgrade -y
Install kaboxer in Kali Linux
Install kaboxer Using apt-get
Update apt database with apt-get using the following command.
sudo apt-get update
After updating apt database, We can install kaboxer using apt-get by running the following command:
sudo apt-get -y install kaboxer
Install kaboxer Using apt
Update apt database with apt using the following command.
sudo apt update
After updating apt database, We can install kaboxer using apt by running the following command:
sudo apt -y install kaboxer
How To Uninstall kaboxer on Kali Linux
To uninstall only the kaboxer package we can use the following command:
sudo apt-get remove kaboxer
Uninstall kaboxer And Its Dependencies
To uninstall kaboxer and its dependencies that are no longer needed by Kali Linux, we can use the command below:
sudo apt-get -y autoremove kaboxer
Remove kaboxer Configurations and Data
To remove kaboxer configuration and data from Kali Linux we can use the following command:
sudo apt-get -y purge kaboxer
Remove kaboxer configuration, data, and all of its dependencies
We can use the following command to remove kaboxer configurations, data and all of its dependencies, we can use the following command:
sudo apt-get -y autoremove --purge kaboxer
kaboxer
The kaboxer tool has several modes of operation, each with its own subcommand.
kaboxer run
$ kaboxer run --helpusage: kaboxer run [-h]
[--component COMPONENT] [--detach]
[--prompt-before-exit] [--version VERSION]
app [arguments ...]positional
arguments:  app  argumentsoptional arguments:  -h, --help
show this help message and exit  --component COMPONENT
component to run  --detach  --prompt-before-exit
wait user confirmation before exit  --version VERSION
version to run
The main user-facing mode of operation, kaboxer run starts a containerized application. Depending on the configuration, this may result in a text-mode interface, a graphical application, or a headless daemon. If several components exist in the image, the --component option can be used to select which one to run.
kaboxer stop
$ kaboxer stop --helpusage: kaboxer stop [-h]
[--component COMPONENT] [--prompt-before-exit]
apppositional arguments:  appoptional arguments:  -h, --help
show this help message and exit  --component COMPONENT
component to stop  --prompt-before-exit
wait user confirmation before exit
kaboxer stop stops a running container. It can be used in system scripts for instance.
kaboxer build
$ kaboxer build --helpusage: kaboxer build [-h]
[--skip-image-build] [--save] [--push] [--version VERSION]
[--ignore-version] [app] [path]positional
arguments:  app  pathoptional arguments:  -h, --help
show this help message and exit  --skip-image-build
do not build the container image  --save
save container image after build  --push
push container image to registry after build  --version VERSION
app version  --ignore-version    ignore version checks
kaboxer build is normally only used during development. It builds the container image from the specified path.
kaboxer save
$ kaboxer save --helpusage:
kaboxer save [-h] app filepositional arguments:
app  fileoptional arguments:  -h, --help
show this help message and exit
kaboxer save generates a self-contained image of a previously-built container.
kaboxer load
$ kaboxer load --helpusage:
kaboxer load [-h] app filepositional arguments:
app  fileoptional arguments:
-h, --help  show this help message and exit
kaboxer load takes a self-contained image and makes it available for running.
kaboxer purge
$ kaboxer purge --helpusage:
kaboxer purge [-h] [--prune] apppositional arguments:
appoptional arguments:
-h, --help  show this help message and exit  --prune
prune unused images
kaboxer purge removes an image from the container engine.
Examples
The hello-*-kbx packages provide examples for the various modes of operation.
hello-server-kbxincludes a systemd service that starts the server as a daemon. It useskaboxer run hello-serverandkaboxer stop hello-serverto actually start or stop the container.hello-cli-kbxis a text-mode client. It runs in a terminal usingkaboxer run hello-cli.hello-gui-kbxis a graphical client. It runs in a terminal usingkaboxer run hello-gui.
Finally
In this tutorial we learn how to install kaboxer using different package management tools like apt and apt-get. Thank you for reading this post and keep connected to TECH DHEE to continue enjoying excellent posts. Share your views about this post in the comment section below. If you still have any queries, throw them in the comment section. If you find this post helpful, don’t hesitate to share this post on your social network. It will only take a moment, and also it is quite easy and useful for others.